
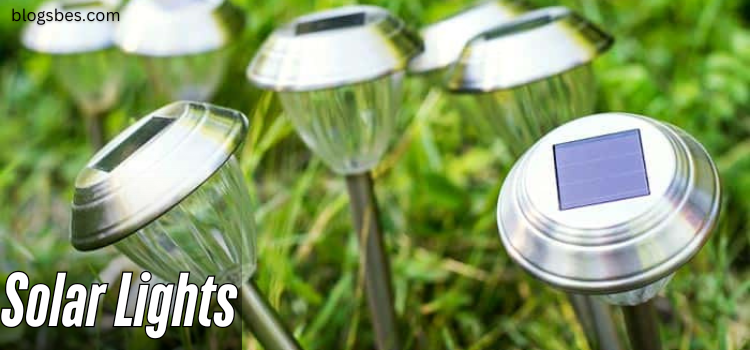
So you’ve spent good money on a quality solar lights, and you want to make sure it runs efficiently and lasts for a long time. In 2025 they are booming and becoming popular and worthy for users. However, over time, these lights lose their efficiency, especially the solar panels, which become hazy and less effective at converting sunlight into power. Without proper care, your perfectly working lighting system can become inefficient and costly to replace.
You can easily clean with simple tools like a soft cloth, mild detergent, and water, which can restore your panel’s health in minutes. This blog shares 6 easy methods to clean without damaging your solar panels. You’ll find not only step-by-step cleaning techniques but also seasonal care tips, tools to avoid, and solutions to common mistakes.
If you’re going to go ahead and do it yourself, I’d rather that you don’t make the most common mistakes that will hurt your solar panels and your pride.
How to Clean Solar Panels on Outdoor Lights? 6 Easy Methods
Here are the 6 easy methods to clean solar light panels on outdoor lights:
Before cleaning your solar panels, remember that they have an anti-reflective coating. Do not use a scourer or harsh chemicals, as they will scratch the coating. Do not use a pressure cleaner. Instead, use a hose and a soft bristle brush.
Method 1: Shine & Shield Cleaning Technique
This is a quick and easy way to clean up all the solar lights around your home.
Supplies Needed
For this process, I have used a couple of different techniques. Here’s what you’ll need:
- Scrub brush—A dish scrub brush from the dollar store or Walmart.
- Dawn dish soap – Combined with water in a spray bottle for easy application.
- Wet or dry sandpaper – Various grits (400 and 2000).
- Painters tape – To protect the border of the solar panel.
- Rubbing alcohol—For final cleaning.
- Cardboard—To assist in the application process.
- Rust-Oleum 2x Ultra Cover Clear Gloss Protectant—Any similar clear gloss protectant will work.
Steps
1. Initial Cleaning with Dish Soap
First, I’m using dish soap to break loose the grime and dirt. I spray water onto the panel, add a dab of dish soap, and use the green side of the scrub brush to scrub the entire solar panel. The goal is to remove as much loose grime as possible without scratching the panel.
2. Sanding the Panel
Since some grime remains after scrubbing, I use sandpaper for deeper cleaning.
- Start with 400-grit sandpaper, wetting both the sandpaper and the panel.
- Gently rub in the direction of the panel’s lines to remove more dirt.
- You may need to repeat this process a couple of times.
- Rinse off the panel with water and wipe it dry.
- If needed, switch to 2000-grit sandpaper for finer cleaning.
3. Protecting the Border
If your lights have a metal border, apply painters tape to protect it. However, be aware that the tape might make it harder to sand the edges.
4. Final Cleaning with Rubbing Alcohol
Use a paper towel with a little rubbing alcohol to wipe down the panel. This helps remove any remaining dirt and grime.
5. Applying the Clear Coat
- To protect the plastic, apply painter’s tape around the panel.
- Use a thin piece of cardboard to cover areas you don’t want to spray.
- Spray a light coat of clear gloss protectant.
- Let it dry for about 10 minutes, then apply another quick coat.
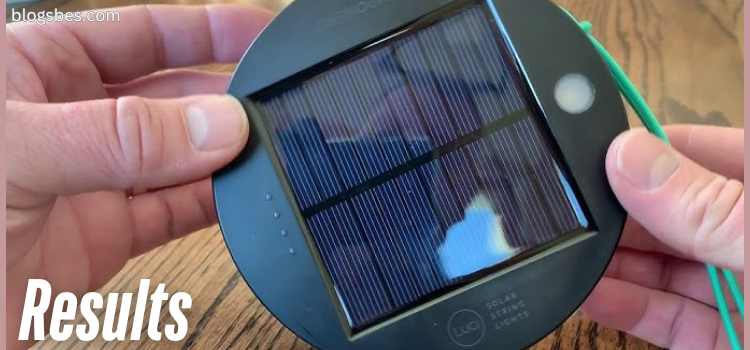
Final Results
Once dry, remove the tape and check out the results. The panel should look significantly better. This is a quick and easy way to clean up all the solar lights around your home.
Important Tips
- Apply enough pressure to remove grime but not enough to scratch the panel.
- This helps clean the panel more effectively.
Method 2: Cleaning Solar Lights with Polish
Before you throw out those old lights, let me show you a quick and easy way to restore them to like-new condition.
Supplies Needed
- One microfibre cloth.
- Mothers’s Mag and Aluminum polish.
- Aluminum Powerball.
- Rust-Oleum Clear Gloss Fast-Drying Non-Yellowing UV-Resistant Spray.
- Painter tape To protect the border of the solar panel.
Steps
1. Cleaning the Solar Panel
The first step is to wipe off the solar panel to remove any dust and dirt.
2. Applying Polish
Next, get some Mother’s Mag & Aluminum Polish. This is the key ingredient for this restoration. Apply a small amount of polish onto the solar panel and rub it in. If some of the polish gets on other parts of the light, don’t worry—we’ll wipe it away later.
3. Buffing the Panel
Attach a Mother’s Power Ball to any drill and use it to buff away the polish from the solar panel.
4. Cleaning Residual Polish
You’ll already notice a big improvement. Now, use a Q-tip or similar tool to clean any polish that may have gotten into the cracks. Then, take some isopropyl alcohol and wipe down the solar panel again to remove any leftover polish. Feel free to clean the rest of the light with alcohol as well.
5. Applying a Protective Clear Coat
To protect the restored panel, apply blue painter’s tape around it to prevent overspray. Then, use Rust-Oleum Clear Gloss Fast-Drying Non-Yellowing UV-Resistant Spray to add a protective layer.
Finishing Touches
After about a minute, remove the painter’s tape. The results speak for themselves—your solar panel is now clean and clear, ready to efficiently convert sunlight into stored solar power. This method is not recommended.
Method 3: Cleaning Cloudy Solar Lights with WD40
I’m going to show you how to restore your garden solar lights, including pathway lights, door lights, or any type of solar panel. You can go from a hazy, damaged panel to a clear one in just a few minutes.
Supplies Needed
- All you need is WD-40 spray.
How to Clean Cloudy Solar Light Panels
The solar panel that captures sunlight, but after long exposure, it becomes cloudy. I’m going to show you how to clean it. If you don’t clean it soon, it won’t be able to absorb sunlight properly.
Steps
1. Spray (WD40) a little bit on top of the panel.
2. Use a paper towel to wipe it off.
3. You’ll see the dirt and oxidation coming off.
Method 4: Cleaning Solar Lights with Vinegar
Cleaning solar lights with vinegar is one of the best solution that I have ever tried, so try it once.
Supplies Needed
- White vinegar.
- One distilled water bottle.
- 100mlSpray Bottle.
How to Clean Solar Lights with Vinegar
Follow these three steps to clean solar panels using vinegar.
Steps
- Prepare a 1:1 Solution: Mix white vinegar and distilled water. Pour the vinegar-water mixture into the spray bottle and shake the bottle to mix the solution well.
- Lightly Mist the Object: Gently scrub hard water spots, dirt, or bird droppings.
- Rinse Thoroughly: Ensure no vinegar-water solution remains on the surface of the solar panel, as it can attract dirt.
Method 5: Cleaning Solar Lights with Nail Polish Remover
Here is the way to clean solar light panels with nail polish remover:
Supplies Needed
- Cleaner (dish soap or household detergent)
- Painter’s tape (optional, to protect the housing)
- Isopropyl alcohol or acetone (nail polish remover)
- Clear coat paint (non-yellowing)
- Sandpaper (grits: 500, 1200, or up to 2000 for a smooth finish)
- Cardboard (for controlled spraying)
Steps
1. Preparing the Panel
- Remove the solar panel housing by twisting it off.
- Be careful not to get water on the battery or electronic components.
- Clean the panel using dish soap or any household cleaner to remove surface grime.
2. Sanding the Panel
- (Optional) Tape off the edges to protect the housing.
- Wet the panel and sandpaper, then gently scrub with 500-grit sandpaper.
- Avoid pressing too hard; you only want to remove the top hazy layer.
- Switch to a finer 1200-grit sandpaper for a smoother finish.
3. Drying and Prepping for Clear Coat
- Dry the panel completely.
- Wipe it down with isopropyl alcohol or acetone to remove any leftover grime.
- Let it sit for a few minutes to fully dry.
4. Applying the Clear Coat
- Use a piece of cardboard with a cutout to spray precisely.
- Apply a light, even layer of clear coat.
- Let it dry for 10–15 minutes, then apply another coat.
The panel should now look brand new and ready to absorb more sunlight.
Method 6: Cleaning the Solar Lights with Toothpaste
Cleaning solar lights with toothpaste is also a very effective method to clean solar panels. You can use any type of toothpaste because this hack will really help you.
Supplies Needed
All you need is toothpaste and a toothbrush.
Steps
- Dampen the surface of the panel.
- Apply toothpaste to the toothbrush.
- Gently scrub the panel to remove dirt and oxidation.
- Wipe clean and dry.
It doesn’t cost anything to try this, so why not? I don’t expect it to work, but you never know.
Conclusion
All these 6 methods are very quick and easy so it depends on the condition. You can choose which is suitable for you but our recommended methods are 1,2,4, and 6. So don't waste your time just follow the simple steps and make your garden, yard, or outdoor brighter. I hope this blog will help you.
Basic Cleaning Advice
Unless your panels are visibly filthy, cleaning them won’t help much. In some areas, panels will self-clean, and you may only need to check them once every three years. In particularly dirty areas or if you have a pigeon or possum problem, you may want to clean your panels and inspect them every year.
What is the Best Time to Clean Solar Panels for Better Results?
Dirty panels will only produce about 50% or less of their potential energy output. Cleaning them will restore them to 100% production, ensuring maximum efficiency. You should clean your panels early in the morning or later at night, especially if the temperature is expected to be over 100 degrees.
Importance of Regular Cleaning
If you don’t clean the solar panel, it will become too oxidized and won’t absorb sunlight efficiently. So clean your lighting system after every 2-3 months.
Why Do Solar Panels Get Cloudy?
The haziness on your solar lights happens because they have plastic covers with a clear protective coating, similar to car headlights. Over time, sun exposure damages this coating, causing it to haze up. Glass panels don’t have this problem, but most solar lights use plastic.
FAQ’s
Why Do Solar Panels Get Cloudy?
The haziness on your solar lights happens because they have plastic covers with a clear protective coating, similar to car headlights. Over time, sun exposure damages this coating, causing it to haze up. Glass panels don’t have this problem, but most solar lights use plastic.
Why Do Solar Panels Get Cloudy?
Over time, sun exposure damages this coating, causing it to haze up. Glass panels don’t have this problem, but most solar lights use plastic.
Best Time to Clean Solar Panels for Better Results?
You should clean your panels early in the morning or later at night, especially if the temperature is expected to be over 100 degrees. Spring is a great time to do this cleaning. Just go around the panel and wipe off any dirt buildup. Here are the 5 easy methods to clean solar panels on outdoor lights.
Most Related

NADRA Jobs 2025 – Complete Guide to Career Opportunities, Departments & Eligibility

How to Earn 1000 rs Per Day Without Investment Online

How to Earn Money as a Nurse – 17 Proven Ways

Plz give me laptop for my study university student
Government of Punjab Free Laptop Scheme
Click the Apply Now button and fill the required information.